DS Lite AC Adapter USB mod
Seeing how I'll be going overseas for a month and the DS lite AC Adapter is only made for 100-120 V not 240V. I would need to get the Euro AC Adapter or the DS usb cable.
Well I have spare/scrap USB cable, soooo...
Parts:
ok, first you have to open the AC Adapter. Nintendo just have to make things complicated by using tamper resistance Torx screw (ugh)
For anyone that has open a Gameboy Advance triwing screw should be able to open this.
You'll need the small screwdriver and a plier/wrench/vice grip/ect..

The pic on the left is a top view of the Torx Screw. The red line is where your screwdriver need to go. Wedge it in and with one hand putting pressure down on the screwdriver. Take the plier with the other hand and use it to turn the screwdriver. (right most pic)
OR you can snap the middle post off (not easy) and just use the flathead screwdriver.

Time to use that (butter) knife or large flat head screwdriver.
From the pic, there are tabs holding the case together. (well those are the tab slots that the tab holds on to)
Two on each side, one on the top.
Just use a knife/screwdriver to wedge it open.
Whew, hard parts done. Now start on the USB cable.
For the female end, eye the length of wire needed from the circuit board and cut.
Use the knife to cut away the jacket.
Peel away the mylar protection and gather the ground shield wires.
Cut away the white & green wire, you only need the red & black.
Strip the ends off the Red & Black. Twist the ground shield wires together with the Black (gnd)
Cut about an inch from the male plug and repeat the process from the female end.
Time to heat up the iron.
Desolder the wire from the circuit. Don't worry if you forget which hole is which, it's labeled :P
Solder the female USB plug to the circuit board. Make sure the gnd shield and the black wire gets soldered in the same hole.
Electrical tape the wires up to prevent any shorting.
Solder the Male USB end to the AC adapter wire that you Desolder from before.
Red with Red & Black with Black.
Make sure not to forget to put on the heat shrink before soldering.
You'll need 3, two for the red & black and one large for the wire itself.
I used some hot glue to give the soldered area some support, so a simple tug won't break my soldering points. Do the same for the female end too. Since the hole was for the thin wire, once you put it back together, it should hold the USB firmly.
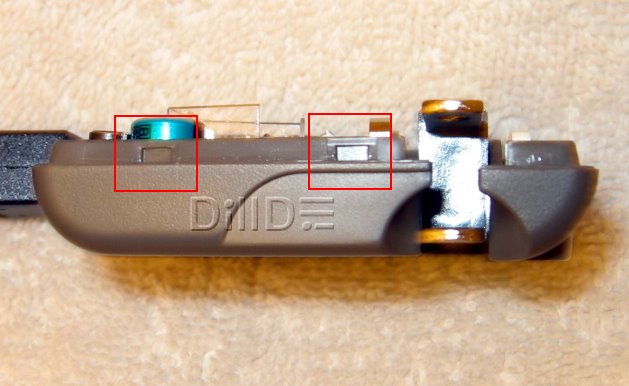
Now plug the USB together and use your multimeter to do a continuity test. The pinout for the DS plug is on the AC Adapter (nintendo did a nice job labeling stuff!)
If you hear beeps you good to go.
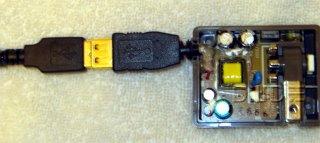
Now screw it back together and you have a USB/AC Adapter!

Testing!

IT WORKS!!

SUCCESS!
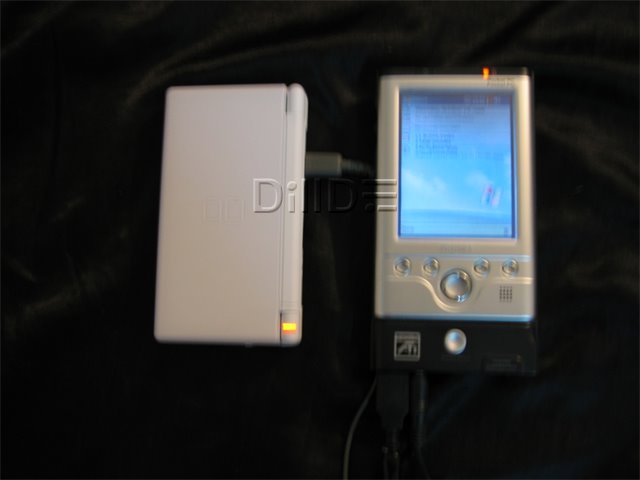
Testing it using e740 PDA with expansion pack (USB port, vga out, etc)
Now I can charge my DS anywhere I go!
Extra:
Well I have spare/scrap USB cable, soooo...
Parts:
- DS Lite AC Adapter
- USB cable
- heat shrink, electrical tape or liquid tape
- small screwdriver
- Plier, wrench, or vice grip, ect...
- solder iron & solder
- glue gun (optional)
- knife or large flat head
- knife, wire stripper or scissors
- Multimeter (optional)
ok, first you have to open the AC Adapter. Nintendo just have to make things complicated by using tamper resistance Torx screw (ugh)
For anyone that has open a Gameboy Advance triwing screw should be able to open this.
You'll need the small screwdriver and a plier/wrench/vice grip/ect..

The pic on the left is a top view of the Torx Screw. The red line is where your screwdriver need to go. Wedge it in and with one hand putting pressure down on the screwdriver. Take the plier with the other hand and use it to turn the screwdriver. (right most pic)
OR you can snap the middle post off (not easy) and just use the flathead screwdriver.
Time to use that (butter) knife or large flat head screwdriver.
From the pic, there are tabs holding the case together. (well those are the tab slots that the tab holds on to)
Two on each side, one on the top.
Just use a knife/screwdriver to wedge it open.
Whew, hard parts done. Now start on the USB cable.
For the female end, eye the length of wire needed from the circuit board and cut.
Use the knife to cut away the jacket.
Peel away the mylar protection and gather the ground shield wires.
Cut away the white & green wire, you only need the red & black.
Strip the ends off the Red & Black. Twist the ground shield wires together with the Black (gnd)
Cut about an inch from the male plug and repeat the process from the female end.
Time to heat up the iron.
Desolder the wire from the circuit. Don't worry if you forget which hole is which, it's labeled :P
Solder the female USB plug to the circuit board. Make sure the gnd shield and the black wire gets soldered in the same hole.
Electrical tape the wires up to prevent any shorting.
Solder the Male USB end to the AC adapter wire that you Desolder from before.
Red with Red & Black with Black.
Make sure not to forget to put on the heat shrink before soldering.
You'll need 3, two for the red & black and one large for the wire itself.

I used some hot glue to give the soldered area some support, so a simple tug won't break my soldering points. Do the same for the female end too. Since the hole was for the thin wire, once you put it back together, it should hold the USB firmly.
Now plug the USB together and use your multimeter to do a continuity test. The pinout for the DS plug is on the AC Adapter (nintendo did a nice job labeling stuff!)
If you hear beeps you good to go.
Now screw it back together and you have a USB/AC Adapter!

Testing!
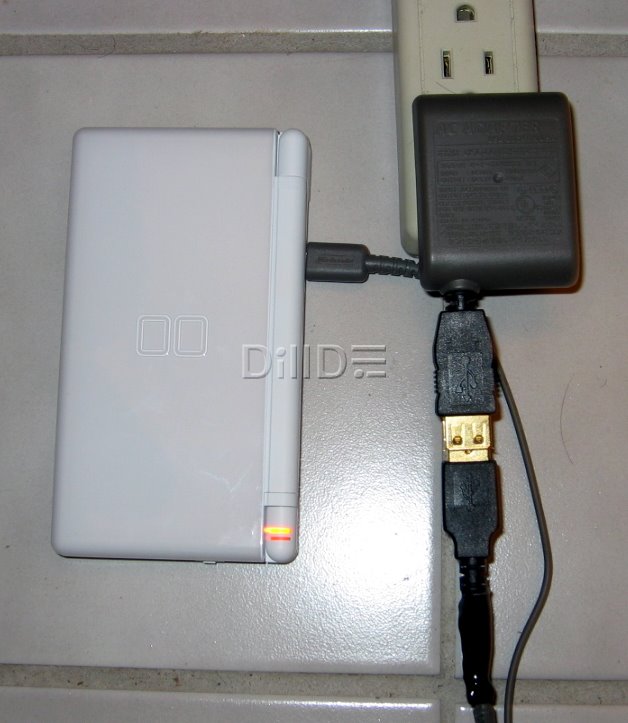
IT WORKS!!
SUCCESS!
Testing it using e740 PDA with expansion pack (USB port, vga out, etc)
Now I can charge my DS anywhere I go!
Extra:
- Now it might be possible to charge your USB stuff with the AC Adapter, but I'm not brave enough to try it :P
- might want to add a diode to prevent reverse voltage, but might add a voltage drop to the already low 5.02V usb power (DS Lite takes 5.2V)
posted by DillDoe at
2:37 AM
|
2 comments
![]()